Bareroot Plants >>
Potted Plants >>
Ground Covers >>
Vines >>
Bareroot Plants >>
Potted Plants >>
Ground Covers >>
Vines >>
Annuals and Perennials - What's the Difference?
Annuals and perennials comprise the two major groups of ornamental plants. Annuals grow for a single season, while perennials come back year after year, sometimes growing larger or naturalizing. Some plants function as perennials in warmer climates but can be used as annuals in cold climates where they don't survive winter. There's no wrong way to mix annuals and perennials-it's all about finding the plants that suit your garden and the time you can allot to them.
What Are Annual Flowers?
Annuals are among the easiest plants to grow-they only grow for a single season, and reward you with big, bold flowers. Annual flowers pop up in the aisles of garden centers and supermarkets each spring, and it's easy to see why they're so well-loved. Pansies, vinca, lanta, marigolds, and geraniums are favorites in the United States.
Some annuals, especially those native to North America, can actually re-seed and reproduce in the soil. Many gardeners who plant petunias or snapdragons find "volunteers" popping up the next season! Or, try saving seeds by collecting them at the end of the season and replanting them. Zinnias and marigolds are easy plants for seed collectors.
Types of Annual Flowers & Plants
Different types of annuals grow at different times of the season and can have different uses. You can think of annuals in terms of hardiness, i.e., how well they stand up to the cold.
Tender annuals need warm soil and warm air temperatures to grow well, and won't grow in early spring, fall, or in climates that just aren't warm enough. Tender annuals won't tolerate frost and will wilt if they experience any cold soil or cold air, so keep them indoors until after the soil has warmed and all threat of frost has passed. Annual begonias, coleus, vinca, zinnia, impatiens, and salvia are examples of these "hothouse" flowers.
Half-hardy annuals can tolerate cool soils and cool air, but they can be damaged by frost. For best results, wait until after your final frost date before planting, or just prior to that date. Dianthus and lobelia are in this group, along with petunias and geranium.
Hardy annuals can tolerate a little cold air, making them excellent for early spring plantings. Ornamental cabbage and kale, pansy, snapdragon, and dusty miller can experience light frost without damage and are excellent harvest-time annuals. These can usually be planted about four weeks before the frost-free date in your area.
Tender perennials can also act as annuals. Begonias, dahlias, and tropical hibiscus last through winter in warmer zones, but need to be lifted, potted, and brought indoors for the winter in cold zones. Many gardeners choose to re-home those tender bulbs indoors, or elsewhere in the garden, after their initial season.
The Benefits of Growing Annuals
Annuals only bloom for a single season, but they tend to have a long flowering season with bright, showy petals. Plus, gardeners can choose to mix and match annuals each year, creating a different look every spring and summer. If you're an inexperienced gardener, annuals are a great way to get your feet wet.
You can think of your favorite perennials as the stars of your garden, with annuals coming in for season-long cameos. Thanks to their relatively small root systems, annuals are great for filling in gaps in the garden, and work well in planters.
Annuals Tips and Tricks
So, how do you choose which annuals to use? Think through the following as you select your flowers for the season:
-
Consider sun and water needs. Sun-loving annuals need over six hours of sun per day, while partial-sun annuals can make do with less, and shade annuals prefer shade all afternoon.
-
Consider the existing infrastructure of your garden. Try to look at photos or notes from last year when you plan your annuals, and don't plant annuals over top of perennials that haven't yet sprouted.
-
Play with height. Choose shorter annuals to pair with tall perennials, or use tall zinnias to line the back of a bed or border. Because annuals are excellent container plants, you can try using a tall urn or planter to add even more interest to your garden.
-
Plan to water your annuals. Annuals have shorter root systems than most perennials, and need consistency in watering. Water them deeply two to three times a week after planting, watering at the base of the plants rather than hitting the leaves and flowers.
-
Read up on fertilization. Depending upon your type of annual, your flowers may need fertilizer to keep the bloom display going all season. Check any packaging for instructions, and find out what type and frequency of fertilizer work for your annuals.
-
Pull your annuals at the end of the year. While many annuals require deadheading to stay tidy, they don't need to stay in the ground until spring-they aren't coming back! Go ahead and remove them during your fall cleanup.
While annuals are gone after just one year, annual gardening is a wonderful tool to keep in your belt. Use them to fill in the garden or add unique colors to suit your mood for the year.
What Are Perennials?
Perennial plants regrow at the same time each season, and their roots or bulbs live underground year-round. Perennials that are cold-hardy in your area are able to survive the winter and bounce back in spring or summer. Most perennials favor a single season, but some varieties have long bloom times that start in spring and extend to autumn.
If you're a beginning gardener, we recommend sticking with plants that are cold-hardy to your region. Our plants are labeled with hardiness zones, so you know which plants can survive winters in your garden. However, just because a plant isn't cold-hardy, doesn't mean it's totally off the table. Many gardeners choose perennials that aren't necessarily cold-hardy to their zone, and then dig them and bring them indoors at the end of the growing season. Dahlias and calla lilies are favorites for lifting and storing.
Types of Perennial Plants
Perennial plants include any cold-hardy plant that comes back year after year-this group includes most plants! Grass is perennial, for example, as are roses and plants that grow from bulbs. Many herbs are perennial. Let's look at some terms that apply to perennial plants.
Hardy perennials can tolerate frost, either while staying evergreen or after they've gone dormant. "Hardy" simply means "tolerant of cold." Different plants have different levels of hardiness, so make sure to choose perennials that are hardy in your zone.
Herbaceous perennials die back to the ground at the end of the season. Most hardy perennials go dormant in winter, and their leaves die back. However, the roots remain alive, though hibernating, and they'll re-enter the scene in spring. Iris, peonies, daylilies, and shade plants are all herbaceous.
Woody perennials include shrubs,
roses, and
trees, while
semi-woody perennials include trunkless plants that have woody stems, like lavender. Woody perennials go dormant in the winter, but their stems or branches don't die back. Some perennials actually bloom on wood that grew in previous seasons, and some only bloom on new wood. Woody perennials typically need pruning, but do not need to be cut back entirely.
Tender perennials cannot be overwintered in areas where frost occurs. Dahlias and begonias are both examples. These plants can't be left outdoors, except in warm southern regions. Many gardeners grow tender perennials as annuals.These are perennials that can't be overwintered outdoors except in tropical or sub-tropical regions. A good example of this would be coleus. In Florida, these plants may grow year round outdoors, but would die in colder climates.
The Benefits of Growing Perennials
Although perennials sometimes cost more initially, they're a good investment for gardeners who want to see their plants come back every year. Many perennials, including bulbs and irises, can also be divided after a few years, so you'll end up with more perennials than you purchased. Perennials become a part of your landscape, and can help prevent erosion and welcome pollinators. They also tend to be larger than most annuals, and require less water once established.
Perennials Tips and Tricks
- Perennials are such a varied group of plants-care for a dwarf toad lily will certainly be different than care for a large rose bush. However, here are some rules of thumb to follow:
- Consider size when you're choosing your perennials, and think about both width and spread. Place tall plants behind large ones, and give your plants plenty of room to grow.
- Consider sun needs and whether your perennials will need protection from other elements, like wind. Again, sun plants typically need at least six to eight hours of sunlight per day. Some plants, especially tall perennials, can use a windbreak, too.
- Don't skimp on working the soil. You can help your perennials get off to a great start by amending the soil and breaking it up before planting. Be sure to aerate deeper than you plant, so that your plants' roots will have room to grow.
- Plant at the right depth. Most bareroot and potted perennial plants need to be planted so that the entire root system is below the soil.
- Water your perennials well over their first season. While many perennials are drought-friendly once established, they can benefit from additional watering while they're still getting settled in their new home.
Perennials are a real investment in your garden, and you'll find that the right care helps you get the biggest bang for your buck.
Planting Annuals and Perennials
While annuals and perennials have different life cycles, planting can be similar for both. The way you set a plant into the ground is dependent upon how it arrives to you. Unless you're growing from seed, you'll purchase plants as bareroots, bulbs, or potted plants. With Michigan Bulb, those already-started plants are shipped directly when they're ready to plant. Let's look at planting annuals and perennials.
Bareroot Plants
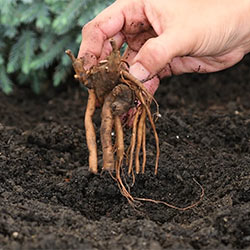
Many plants do best when shipped in a dormant or bareroot
condition without any soil around the roots. Often plants shipped this way may
appear to be dead. However, dormant or bareroot plants are living plant material
even though they may be completely void of green buds or leaves. They've been
conditioned for shipping and will be ready to grow after planting. It may take as long
as 6-8 weeks before they sprout to the point where growth is obvious.
Before planting, make sure roots are moist
and soak briefly. Follow the guidelines below
for your perennial root type:
Fibrous roots (i.e. carnations, geraniums,
phlox, etc.) need to be spread downward
and not cramped. The crown (where roots
meet stems) should be level with or slightly
above the soil.
Long taproots (i.e. hollyhocks, hibiscus,
columbine, poppies, etc.) should extend
almost straight down. To avoid possible
rotting conditions, place the crown just
below the soil line.
Rhizomes (i.e. bearded, Japanese and Siberian irises)
should be planted near the surface. A small portion of
the rhizome, where the leaves connect, should be visible
above the soil.
Roots with eyes (i.e. peonies) are placed in a hole on
a cone of soil with the crown just below ground level.
Spread roots around the cone. Lightly cover the crown
with soil.
Fleshy roots (i.e. daylilies, hostas) should be planted in
a hole twice as wide and twice as deep as the bareroots.
Create a mound in the planting hole to hold the roots and
the crown (where roots meet the stem) at ground level.
Spread the roots over the mound. Fill the planting hole
with soil and firm with both hands. Water thoroughly.
Bareroot perennials should not be planted too deep.
The crown of the plant (where the roots meet the sprouts
or stem) should be at ground level or just below it.
If planted too deep, plants will not get enough air and
growth and flowering will be poor.
Potted Plants
When you receive your
potted plants, you may find some leaves
appear to be yellowing or even dead. That
doesn't mean the plants are dead. As long
as the root system is healthy, upper foliage
will soon regenerate.
Your potted plants require little attention
before transplanting:
| Make sure the planting medium is still
moist and water if the top is dry.
Groom the plant by pinching off any
less-than-healthy leaves (for example,
leaves that are yellowed or withered).
Transplant potted plants to their new
home as soon as possible after your
shipment arrives.
Remove plants from their shipping
pots by lightly squeezing or tapping
the sides of the container to loosen
the planting medium in which the
plant has been growing. Then, invert
the pot, gently shake the plant loose
and proceed with planting.
|
Plants which seem to be tightly bound to
their pots may be "root bound." However,
they are easy to remove and prepare for
planting:
| First, squeeze the container to loosen
the compacted root ball inside.
Invert the pot and shake the plant out
of the container.
If you find a mass of roots tightly woven
into the planting medium, cut or tear off
the bottom third of the root ball.
Using a knife or trowel, score a vertical
mark on all four sides of the root ball.
Even though you will be cutting some
roots, loose ends have a tendency to
grow outward into the surrounding
soil, while unscored roots grow in the
root ball itself after planting and may
cause decreased vigor.
Some plants arrive in Ellepot® paper plant
pots. These are our environmentally
friendly, biodegradable paper pots. You
can plant the whole root ball directly into
the ground. There's no need to remove
the paper covering the root system. For
the first two weeks after planting, water
regularly. The soil inside the Ellepot may
be more porous than the surrounding
soil and will dry out quicker. Once the
roots take hold into the surrounding soil,
less watering is necessary.
|
Ground Covers
Ground Covers plants
prefer deeply worked, properly fertilized soil
which is free from weeds. Dig individual
planting holes and plant each ground cover
plant as outlined above for other potted
plants. To create the most natural effect,
stagger your planting. If your planting is on
a slope, follow the contours with staggered
spacing, leaving a depression around each
plant to catch water.
Spread a 1-2" layer of mulch over the
area surrounding the plants, being careful
not to bury them. This helps retain
moisture in the soil and retards weed
growth. Maintain the mulch covering
until your ground cover plants have
spread to cover the entire planting site.
Vines
Most vines grow best when
allowed to climb up a vertical support.
When planting a climbing vine near a
building, fence, wall or tree, set the plant
at least 18" from the structure which will
support it. Then gradually train it to grow
over to the structure.
When using garden arbors, mesh-type
fencing, trellises and similar supporting
structures that are in the open, plant the
vine close to the support.
Don't let your vines form into a
tangle. They should be pruned frequently
through the summer, spreading and
tying the shoots to keep them to a single
"layer" over the support.
To establish your clematis vines, keep
the root system cool. A sunny location
where roots can grow under a cool
covering, such as other perennials or
mulch, is ideal. Deep planting--about a
half inch deeper than it was grown in the
nursery--encourages extra-strong root
development, and frequent, thorough
watering will encourage vigorous growth.
Plant your vine about 4-6" away from
its trellis or support system. This gives
its roots space to expand and grow. To
get your vine going in the right vertical
direction, use twine or tie-wraps to loosely
attach the plant to the trellis. Vines with
tendrils will twine around the support,
while other vines may require you to
loosely twine the vine around the trellis.
Have another question? Return to the Customer Service Help page or send an e-mail directly to Customer Service
©2023 Gardens Alive, Inc. All rights reserved. Michigan Bulb Company® is a registered trademark of Gardens Alive, Inc.
This site is protected by reCAPTCHA and Google
Privacy Policy and
Terms apply.