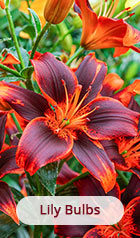
Iris flowers make showy additions to the garden as eye-catching displays, especially when planted in groups and large masses. Irises are also impressive as cut flowers. Iris bulbs grow best where they receive several hours of direct sunlight throughout the day.
Dutch Iris grow from bulbs and
German Iris grow by rhizomes which can be divided and shared for best blooming throughout the years. Iris flowers are hardy and pest-resistant, giving a regal appearance with very little work. Check out Michigan Bulb's wide collection of irises for sale today!
More information about iris bulbs
When To Plant Iris Bulbs:
The correct time to
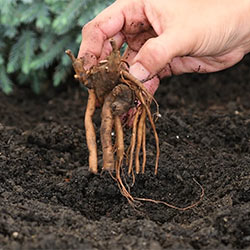
plant iris bulbs is a point of confusion for many gardeners, in part because irises aren't truly bulbs. Irises grow from rhizomes. Rhizomes, like bulbs, contain compacted parts of the flower that grows out of them, but rhizomatous plants grow roots horizontally from the "eyes" of the rhizome. Ginger is an example of a rhizome. Some rhizomes are best planted at the very beginning of the growing season, while some should be planted in fall.
Like iris flower bulbs, German iris rhizomes should be planted in the fall at least six weeks before the first hard frost in your area. Fall planting allows the irises time to settle before the cold winter. Plant them in earlier fall, while the nights are still above frosty temperatures.
How To Plant Iris Bulbs:
Other than their preference for fall planting, what else do you need to know to plant iris bulbs? Irises, especially the German irises popular in American gardens, are extremely easy to plant and grow.
Where to plant iris bulbs:
Iris plants thrive in sunny spots! While some varieties of iris can tolerate up to a half day of shade, most won't flower well in shade. To give your iris bulbs their best start, choose a sunny location with well-draining soil.
Due to their tall stature, irises are a popular choice for the back of a flower bed, or planted in a large clump as a standalone accent. Dwarf irises are also available, and are perfect for the front of a bed or border. Iris flower bulbs are often planted in rock gardens, by retaining walls, or beside mailboxes or birdbaths, they also grow well on hillsides or slightly graded areas.
How to prepare the soil for iris bulbs:
Loosen the soil in your planting location with a tiller or spade, to about one foot deep. Irises need fertile, slightly acidic soil--which your land may already offer. If you have sandy or clay soil, mix in compost before planting your iris bulbs. If your soil quality is particularly poor, dig out a trench to fill with a mix of compost and potting soil.
How deep to plant iris bulbs:
For easiest planting, simply dig a trench about two inches deep, and leave a line of raised soil in the middle of the trench. Then, place the rhizomes on the raised line, so that their roots spread down, now backfill the soil leaving the tops either slightly exposed or just under the soil.
How to space iris bulbs:
Depending upon the size of your iris plants, bulbs can be placed in groups one to two feet apart, with three bulbs per group. Grouping the bulbs allows for a fuller look when the irises bloom.
How to care for iris bulbs after planting
After planting, water the irises in well. Don't mulch over your iris bulbs, as iris rhizomes need more access to air than other bulbs and mulch can lead to rot. Iris should not be fertilized until approximately a month after all flowering is complete.
How to Divide Iris Bulbs:
It's easy to divide and transplant iris bulbs, and division can keep your plants from becoming overcrowded. Plus, when you divide, you'll have more irises to plant in your landscape!
Pull the root clump up from the ground. If the leaves haven't already died back, cut them to a few inches above the clump. Use a clean knife or spade to cut the rhizomes into pieces, but make sure that each section includes several roots as well as top leaves. Dispose of any rhizomes that look diseased or moldy, or that have soft spots. Then, simply reset the iris rhizomes in the ground, at the same depth and spacing that you planted them originally. For most varieties, the rhizomes should be planted near the soil surface, with the top of the rhizome slightly exposed or just under the ground. Plant them two to three feet apart, depending upon the mature size of the plants.
When to Divide Iris Bulbs:
Iris bulb division is best planned during the early fall, around the same time as planting season for irises. Fall division gives your plants time to re-establish roots before winter's harsh weather. To maintain the shape and health of your iris plants, it's best to divide every two or three years.
When do iris flowers bloom?
Irises have some of the longest bloom times in the garden! Irises have a bloom period ranging from early spring into summer, so you can enjoy them for weeks on end. By choosing irises with different bloom times, you'll make sure there's never a lull in your landscape. Mix early-bloomers and late bloomers to get a long iris season. Some irises, called reblooming or remonant varieties, bloom once in the early summer and again in the fall.
How to care for iris flowers:
Iris plants are extremely low maintenance--they require deep watering only when first planted, then normal watering every couple of weeks. If your irises are tall varieties, be sure to stake them to ensure they don't fall over. After they've bloomed, deadhead your irises by removing the faded flowers where they meet the stems. When all flowers have bloomed on a stalk it can be removed by cutting back at the base. About a month after all your irises finish blooming you may apply a low nitrogen, light fertilizer of bone meal, or a 6-10-10 blend and water in.